Account Generator Workflow Example This article illustrates the steps one needs to implement to build an Account Generator Oracle Workflow for eBusiness Suite. For this exercise I am using iProcurement & core Purchasing Account generation workflows. However, the concepts remain the same for all the account generator workflows, regardless of the module.
Assume that we have two Accounting Flexfield segments in Oracle General Ledger:-
1. Company Account
2. Cost Centre
Important: In real life, you will have more than mere two segments in the GL Accounting Flexfield. These pseudo Two GL Segments are for demo purposes only.
Assuming that you have implemented Oracle Projects Accounting, the Requisition or a Purchase Order can either be Project based or can be Non Project based. For this exercise, for simplicity, lets restrict ourselves to Project Based Requisition.
Lets assume that the business requirement for Project Based Requisitions is:-
Company Segment for Projects based Requisition
Company Account Segment will be Defaulted to a constant value of GO4GOLD
Cost Centre Segment for Projects based Requisition
This will be defaulted from the Attribute1 against Primary Organization for Project Task .
OK, here we go with all the steps that are required to build such an Account Generator Workflow.
Step 1
Open the account generator Workflow

Step 2.
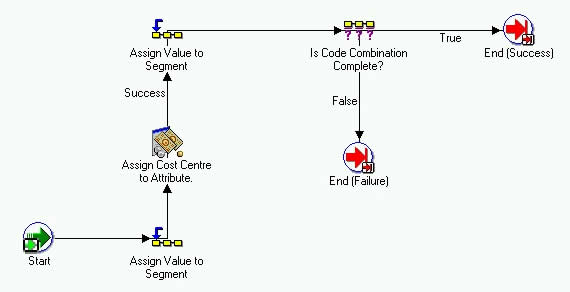
Assign default value to Company segment.
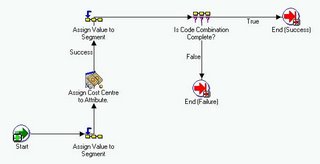
Double click to open the process “Build Expense Project Charge Account”
After the Start Icon, Right Click to create a new Function.
As in screenshot below, in “Item Type” field, select “Standard Flexfield Workflow” from the drop down list. In the Display Name select “Assign Value to Segment” and click on OK.
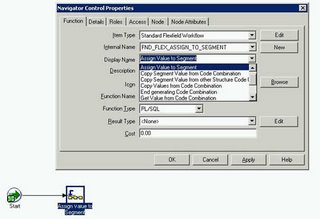
By doing the above step, we have just created a workflow Function that is capable of assigning a desired value to GL Flexfield Segment. Now we need to configure this Function further, so that it knows the Segment upon which it operates, and also the default value that is assigned to the segment.
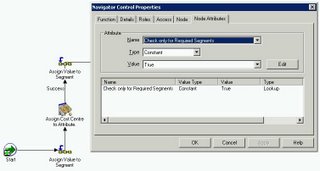
As per our business requirement, we need to default a constant value of GO4GOLD for our Segment1 ( Company Segment ) . For this, click on the function created above, and click on the Node Attributes.
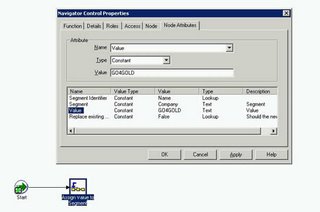
Do the steps, as in above screenshot.
Step 3 ( Part a).
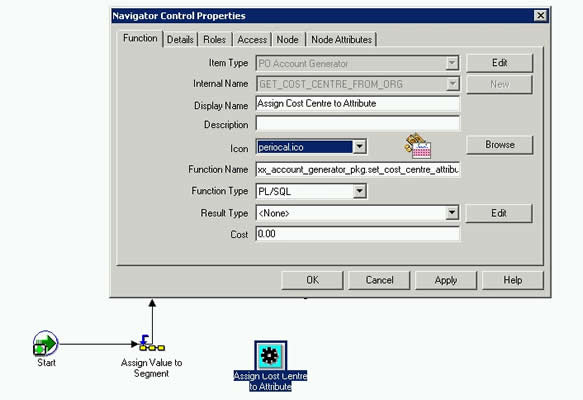
Default the cost centre from Attribute1 against Primary Organization for Project Task. In the Part-a of this step, we will assign the Cost Centre to an Attribute Named “TEMP_CC_VALUE”.
For this, we can define a new function named “Assign Cost Centre to Attribute”, by right clicking on the process.
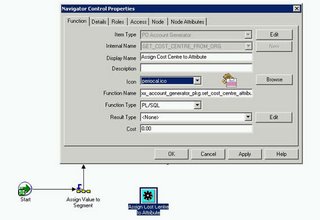
This function calls PL/SQL XX_account_generator_pkg.set_cost_centre_attribute
PROCEDURE set_cost_centre_attribute
(
itemtype IN VARCHAR2
,itemkey IN VARCHAR2
,actid IN NUMBER
,funcmode IN VARCHAR2
,RESULT OUT VARCHAR2
) AS
CURSOR c_get_cc(p_org_id IN NUMBER) IS
SELECT attribute1 org_cc
FROM hr_all_organization_units hrou
WHERE hrou.organization_id = p_org_id;
rec_get_cc c_get_cc%ROWTYPE;
BEGIN
IF NOT (funcmode = 'RUN')
THEN
RETURN;
END IF;
BEGIN
--First nullify the value, so that accidentaly it does not get used in the next step.
wf_engine.setitemattrtext(itemtype, itemkey, 'TEMP_CC_VALUE', '');
OPEN c_get_cc(wf_engine.getactivityattrnumber(itemtype
,itemkey
,actid
,'EXPENDITURE_ORGANIZATION_ID'));
FETCH c_get_cc
INTO rec_get_cc;
IF c_get_cc%NOTFOUND
THEN
RESULT := 'COMPLETE:FAILURE';
ELSE
wf_engine.setitemattrtext(itemtype
,itemkey
,'TEMP_CC_VALUE'
,rec_get_cc.org_cc);
RESULT := 'COMPLETE:SUCCESS';
END IF;
CLOSE c_get_cc;
RETURN;
END;
EXCEPTION
WHEN OTHERS THEN
-- Record error using generic error message routine for debugging and
-- raise it
wf_core.CONTEXT(pkg_name => 'ic_account_generator_pkg'
,proc_name => 'GMS_GET_CC'
,arg5 => NULL);
RAISE;
END set_cost_centre_attribute;
In the above function, we are fetching the Attribute1 against the Organization Record. The organization_id is being passed as a parameter to the Newly defined Function( as in screenshot below).

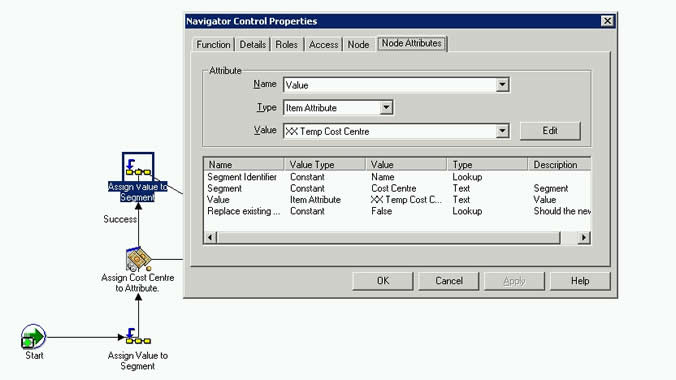
Step 3 ( Part b).
In this part of the step, we will assign the value in Attribute “TEMP_CC_VALUE” to the Segment2 ( i.e. the Cost Centre). This is done as per the screenshot below.

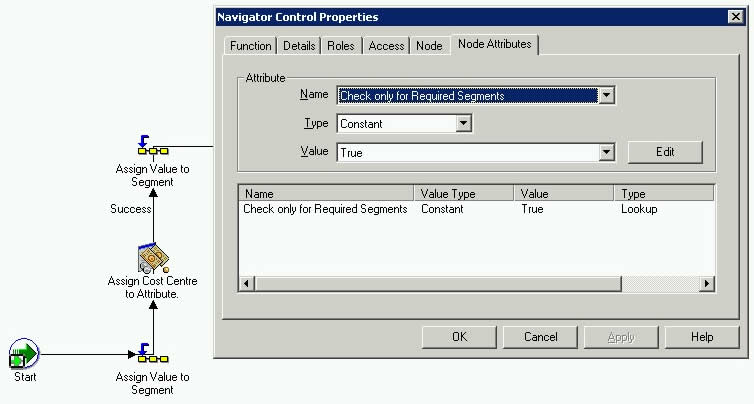
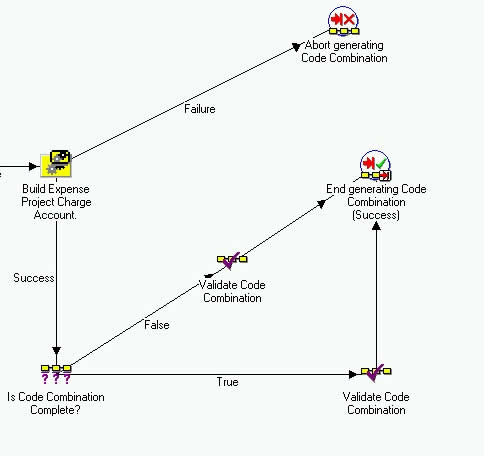
Step 4. Check to see if the Code Combination is Complete
Right click to create a function. From Item Type dropdown list, select “Standard Flexfield Workflow”. In the Display Name dropdown list, select “Is Code Combination Complete?”
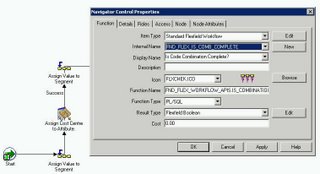
Next, click on Node Attributes, and assign a value of TRUE to “Check only required Segments”.
Step 5.
By implementing the above steps, we have been able to complete the Account Generation of our two-segment Flexfield using Oracle Workflow Account Generator.
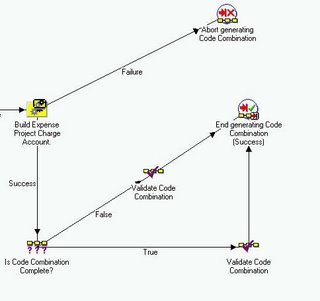
The last and final step will already be there within the Pre-Installed Account Generation. This workflow step validates the Code Combination Id, for the Oracle’s Security Rules that are defined in General Ledger, against users responsibility. For reference purposes this is pasted below.
A final note, for debugging the Account Generator workflow. Account Generator workflows are designed to run efficiently and quickly, hence they always in synchronous mode. This means that no inserts are made into the Oracle Workflow tables when generating the accounting.
Hence by default it is not possible to debug the Account Generator workflow using Status Monitor screen in Oracle Workflow.
However, Oracle delivers a profile option named “Account Generator:Run in Debug Mode”. Setting this profile to Yes, will make Account Genration processes insert records in workflow tables. Hence by setting this profile to Yes, you will be able to debug your account generation workflow. Further debugging of FND_FLEX API’s is made possible by enabling the FND Logging. |


Comments on ""
-
 Anonymous said ... (3:03 PM) :
-
 Anil Passi said ... (3:11 PM) :
-
 Anonymous said ... (5:32 PM) :
-
 Anil Passi said ... (9:09 PM) :
-
 Anonymous said ... (2:06 AM) :
-
 Anil Passi said ... (7:50 AM) :
-
 Anonymous said ... (8:45 AM) :
-
 Unknown said ... (11:20 AM) :
-
 Unknown said ... (11:20 AM) :
post a commentFirst congrats & thanks for the tutorial on workflow amendments, it really helped me a lot.....hope everybody else also must have benefitted with this...
I need a slight help further as in the tutorial....in Step 3 (Part b), you have assigned a value 'XX TEMP COST CENTRE' to Value segment...
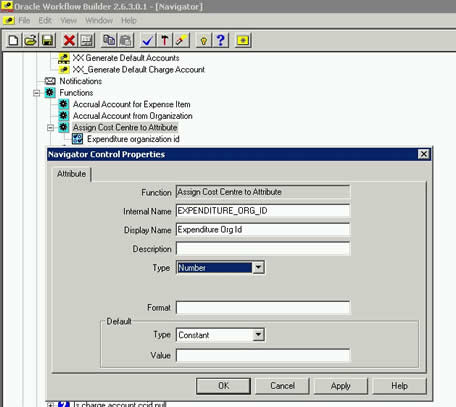
I am trying to modify the the Project Budget Account generation workflow and I tried as you have suggested but I am not able to get the Attribute in LOV.
Hope you must have defined this Attribute exclusively under the new function [Assign Cost Centre to Attribute] in addition to 'Expenditure Org Id' attribute. But still I am not able to get this attribute in LOV....help me how I can get this ?
Thx & Rgds....Vipin
Hi Vipin,
In the object navigator of the workflow, you need to left-mouse-click on the ItemAttribute and drag it down into the function. Once you have dragged that attribute into function, this attribute will become available in the LOV.
Alternate way is to do the below:-
1. Rightclick on Function in question
2. Select "New Attribute"
3. In the Default Section, select Type=Item Attribute
4. Again in the default section, select Value ="Name of the attribute"
Hope this answers your question.
Thanks,
Anil Passi
hi,
How do we "customize the requisition workflow to change cost center segment value from 'x' to 'y' when company segment value is 'z' "?
thanks,
vishal saberwal
Hi Vishal,
Just prior to calling the WF Function "Is Code Combination Complete" you can create a new WF FUNCTION that calls a pl/sql which does below
IF
wf_engine.getitemattrtext
(itemtype => itemtype
,itemkey => itemkey
,aname => 'SEGMENT1') = 'Z'
AND
wf_engine.getitemattrtext
(itemtype => itemtype
,itemkey => itemkey
,aname => 'SEGMENT2') ='X'
THEN
wf_engine.setitemattrtext(itemtype => itemtype
,itemkey => itemkey
,aname => 'SEND_TO_ROLE'
,avalue => v_role_email); wf_engine.setitemattrtext(itemtype => itemtype
,itemkey => itemkey
,aname => 'SEGMENT2'
,avalue => 'Y');
END IF ;
HI anil
can u give a demonstration for how to build a rule based workflow for requisition account generator workflow
which is not project related.
POWFRQAG.wft
In Process "Build Expense Charge Account", first thing you do is to check is the requisitio is Project related. If so, then you call "Build Expense Project Chargeg Account" within which you write the rules similar to example in this article.
In Process "Build Expense Charge Account", if your first function based check states this being non-project,you use "Assign Value to Segments" standard function and then call standard function "Is Code Combination Complete?" to ensure completeness
Hi,
We are trying to customize the "Generate Default Accounts" process. For that we created one custom process: "XX Generate Default Accounts". We added the custom process at Account generator process form. But still it's calling the defauly standard one. Is there any other steps required to call the custom WF process?
Hi all, We are customizing the Account Generator workflow and we want to derive the segments based on the values in the requisition table. How to link the account generaot workflow item key with the requisition tables? Can someone help us with this?
Hi,
We are trying to customize the "Generate Default Accounts" process. For that we created one custom process: "XX Generate Default Accounts". We added the custom process at Account generator process form. But still it's calling the defauly standard one. Is there any other steps required to call the custom WF process?