Oracle Workflows Training Lesson Three
| Welcome to the lesson 3 of the Oracle Workflows Training. One of the common business requests for Oracle Workflows has been to track the progress of Workflow at its various stages. If your business user desires to track the progress of a Workflow, they can do so by viewing the workflow process diagram. However such approach has limitations related to attribute value security of the workflow. Also, that approach is not user friendly, as the workflow may contain various technical but important steps that can confuse end user. Here is the deal, we will write a common workflow function, and re-use that workflow function at various stages of the workflow. The workflow function will be attached to a pl/sql procedure that will insert record into a progress table. User can then trace the progress either via a screen on that table or by some report. The source code of Oracle Workflow Training Lesson 2 is being carried forward here. Please click here if you wish to step back for Training Lesson 2 for Oracle Workflow. This requirement will be accomplished in following steps:- 1. Create a table to track the progress. 2. Create a Workflow Function to pass parameters to indicate progress. Note: For each parameter for Workflow function, we will create one function attribute. 3. Write the pl/sql function to insert record into progress table. Below are steps for Oracle Workflow Training Lesson 3 Step 1. Open process “Main training process”, and create a new WF Function by right clicking the space between “Set Role” & “SET_VALIDATE_FLAG”  Step 2. Now create the function named LOG_STATUS_OF_ACTION. Assign it a function xxxx_po_wf_training_pkg.log_status_of_action 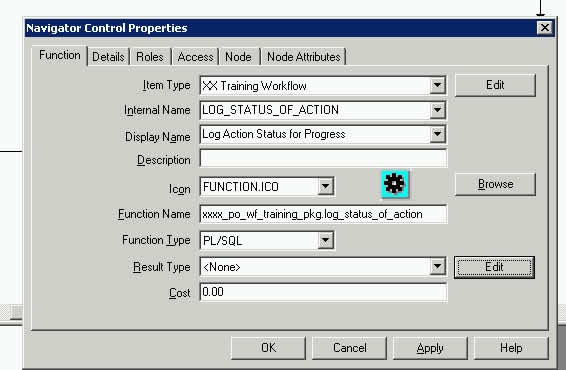 Make this function join to “Set Role” and “SET_VALIDATE_FLAG” Step 3. In the Oracle Workflow Designer Navigator, as in picture below, right click on Function “Log Action Status for Progress”and select new attribute(as created in Step 2 above). 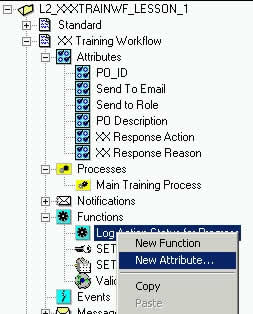 Step 4. Create attribute “ACTION_STAGE” ( Progress Action stage ) 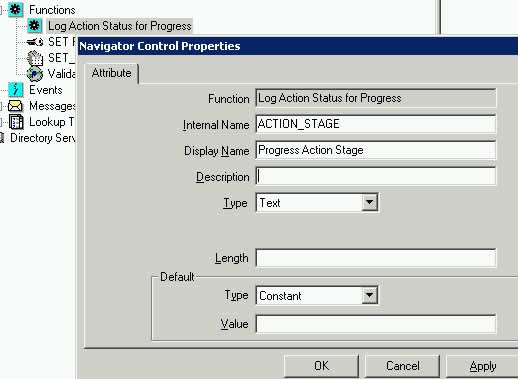 Step 5. Create attribute “ACTION_NAME” (Progress Action to indicate status) 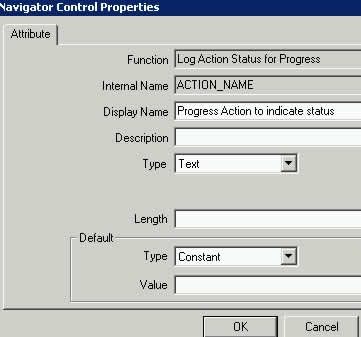 Step 6. Drag the Attribute PO_ID from “XX Training Workflow” and drop that into function “Log Action Status for Progress” As a result of above three steps, you will see something similar to below. Screenshot after having created 3 Function Attributes Screenshot of Oracle Workflow after having created 3 Function Attributes  Step 7. Now, navigate back to process “Main Training Process”. Double click on WF Function “Log Action Status for Progress”. Click on Tab “Node Attribute” Select drop down list in section Attribute Name, select “Progress Action Stage”. Effectively, here we will pass the parameters to the WF Function. Attribute: Progress Action Stage Type: Constant Value: Validation Click on Apply  Step 8. Repeat the step 7 above for second attribute Attribute: Progress Action to indicate status Type: Constant Value: Before Validation Click On Apply  Step 9. Do nothing really, leave the PO_ID to its default value. Remember we had dragged this from WF level Attribute. Hence the function attribute will inherit value for PO_IF from Workflow Level.  Step 10. Right click between SET_VALIDATE_FLAG and “PO Notif Info”, to create a new function, but instead of creating new Function, simply pick the function created in “Step 2”. i.e. from drop down list for INTERNAL, select “LOG_STATUS_OF_ACTION”  Step 11. You will see the WF Diagram as below  Step 12. Now repeat steps 7, 8 & 9. However, the difference being that instead of Step 8, this time our values will be Attribute: Progress Action to indicate status Type: Constant Value: After Validation Image  Step 13. Create the procedure below in package “xxxx_po_wf_training_pkg” PROCEDURE log_status_of_action(itemtype IN VARCHAR2 ,itemkey IN VARCHAR2 ,actid IN NUMBER ,funcmode IN VARCHAR2 ,RESULT IN OUT VARCHAR2) IS n_po_id INTEGER; v_action_name VARCHAR2(200); v_action_stage VARCHAR2(200); BEGIN IF funcmode = 'RUN' THEN --get the PO id, as it is after the hyphen of itemkey in this case n_po_id := get_request_id_from_item_key(itemkey); v_action_stage := wf_engine.getactivityattrtext(itemtype => itemtype ,itemkey => itemkey ,actid => actid ,aname => 'ACTION_STAGE'); v_action_name := wf_engine.getactivityattrtext(itemtype => itemtype ,itemkey => itemkey ,actid => actid ,aname => 'ACTION_NAME'); INSERT INTO xx_po_wf_progress (po_id ,p_wf_action_stage ,p_wf_action_name) VALUES (n_po_id ,v_action_stage ,v_action_name); END IF; RESULT := 'COMPLETE:Y'; END log_status_of_action; Note that the above pl/sql procedure simply reads the value from parameters passed under Node Attributes. Hence there is no hardcoding in the pl/sql. By doing the above, you will be able to track the progress of each transaction in a very simple way. Now for testing…. Step 14. Save the wft file in database( Source code at end of this article) Step 15. Initiate workflow as below…. DECLARE n_new_po_id INTEGER; BEGIN SELECT oe_order_headers_s.NEXTVAL INTO n_new_po_id FROM dual; INSERT INTO xxxx_po_headers (po_id ,vendor_id ,suggested_vendor_id ,po_description ,po_status ,comments_from_approver ,send_email_to) VALUES (n_new_po_id --po_id ,10000 --vendor_id ,NULL --suggested_vendor_id ,'This is PO Training Description' --po_description ,'INITIAL' --po_status ,NULL --comments_from_approver ,' ANILPASSI@GMAIL.comThis email address is being protected from spam bots, you need Javascript enabled to view it ' --send_email_to ); xxxx_po_wf_training_pkg.start_training_wf(p_po_id => n_new_po_id); COMMIT; END; You will then see two records created as below.  The workflow progress will be visible as below  The source code for Training Lesson 3 is available here . |
posted by Anil Passi at 11:22 PM
![]()
Comments on "Oracle Workflows Training Lesson Three"
-
 Anonymous said ... (8:17 AM) :
-
 David said ... (9:03 PM) :
-
 Unknown said ... (4:15 PM) :
-
 Anonymous said ... (10:54 AM) :
-
 Anonymous said ... (1:12 PM) :
post a commentA Wonderfull site to learn Oracle workflow. Thank you so much for giving one like this.
Hi,
Anil
I have a Workflow called 'OM Order Line '.I am trying to customize the Line Flow Generic. In that i have to get approval from manager if sales order greater than some X amount .
Can u pls help me
Thanks
Raj.
Sir.
Those three lessons are absolutely very helpful for me.
Nothing is left to say only 'if you talk about what are the impacts of all drop down element's impact,if we choose the values except what you show in the above lessons.And the functions of all APIs those are used in those lessons.
Have a nice day
Hi, it' my start post and i want bruit about hello to the board :). I like this community and i ambition i go through brobdingnagian time with you, guys ;p
[url=http://blog.bitcomet.com/post/529492/]buy prozac pills online now[/url]
Anil,
Thanks so much for posting this training online, amazing work!!!!!!!!!!!!!
Thanks again for your time and effort.
Raji